Last month, we explored the essentials of developing a volunteer process for vulnerable populations—a topic that frequently comes up in our work. Another common request is guidance on structuring a baptism process. Today, I’ll walk you through a detailed example. While the timing and specific steps for baptisms vary across churches, this in-depth approach offers a wealth of ideas, illustrating how you can customize each step to fit your church’s unique needs while fully leveraging the capabilities of Rock RMS.
Think of it like planning a wedding. Whether it's a casual backyard BBQ or a grand country club celebration, every wedding follows essential steps to create a meaningful experience. Similarly, a baptism should be a memorable moment for the individual while remaining smooth and manageable for staff. By using Rock’s tools, staff can streamline the process, prevent missed steps, and reduce the stress of juggling multiple responsibilities.
Leveraged Rock Tools
The following Rock tools help create an organized and meaningful baptism experience for both the individual and staff:
- Registration – Manages sign-ups for baptism classes or orientation sessions, streamlining participant intake.
- Connections – Tracks initial interest and keeps engagement consistent as individuals move through each step.
- Workflows – Automates steps in the baptism journey, ensuring nothing is overlooked and each stage progresses smoothly.
- Reports – Provides insights into the progress of each candidate, helping staff track milestones and stay prepared.
- Merge Template – Customizes baptism certificates for a personal touch.
Overview of the Process
Here is a summary of the planning steps I'll be reviewing. Each step is anchored to its section, so you can click on a step to jump directly to that part of the article:
- Expressing Interest
- Interview & Scheduling
- Post-Baptism
Flowchart Visual
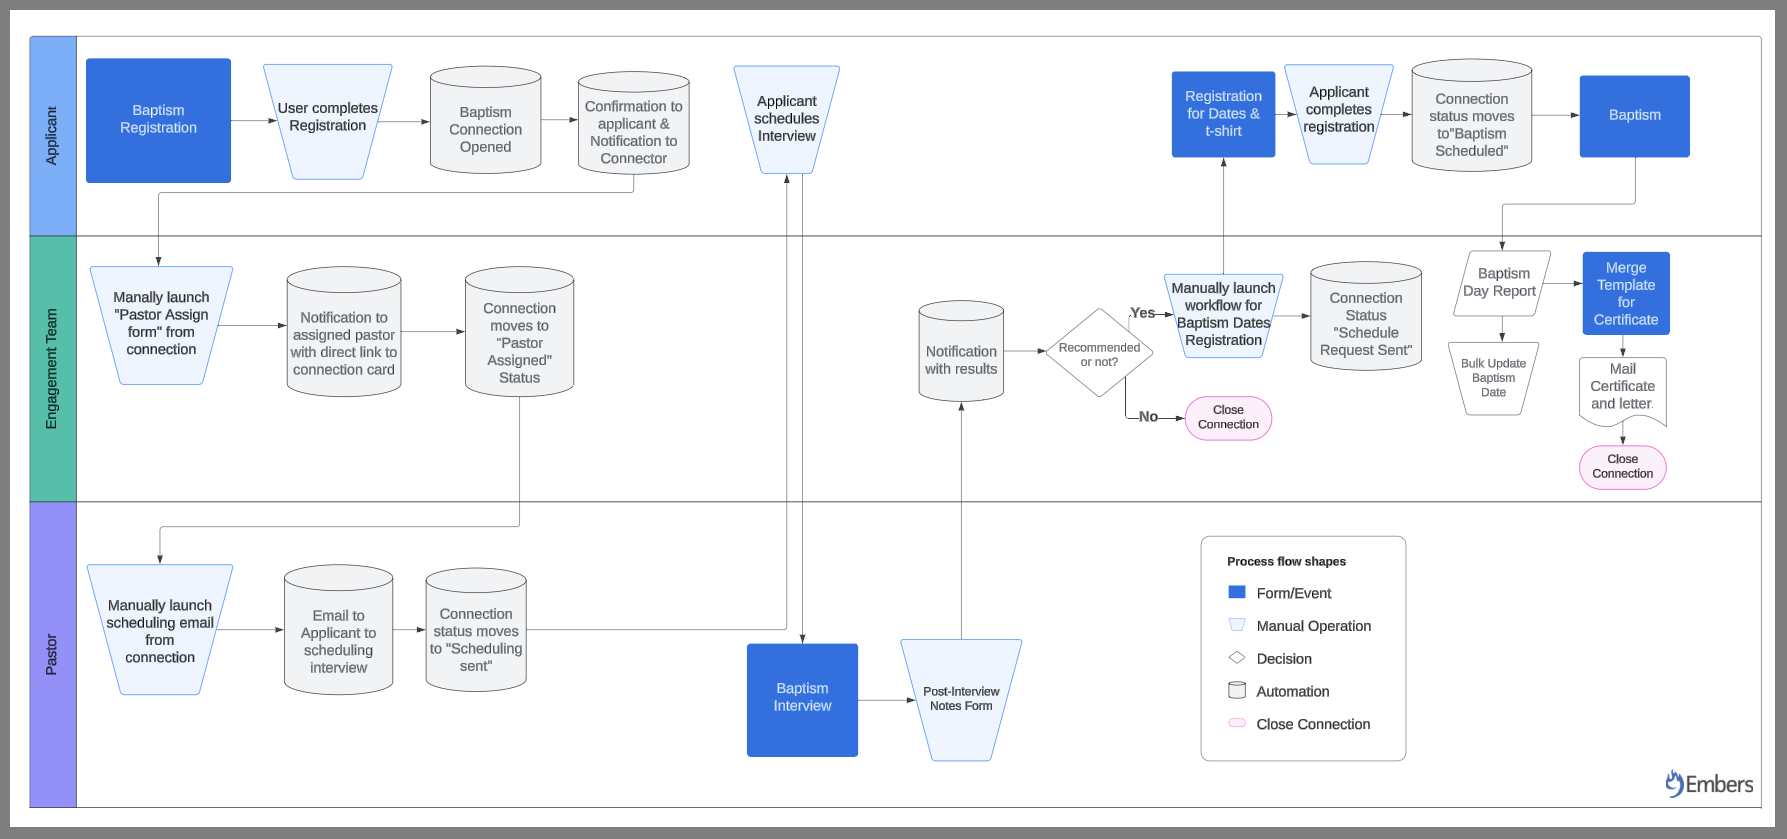
This baptism process includes a flowchart with three lanes: Applicant, Engagement Team, and Baptizing Pastor. Each lane outlines the responsibilities of the respective team or individual, ensuring clarity at every stage. A PDF of this chart is available for download at the end of the article. While this specific process may differ from yours, you may recognize a pattern that can be adapted to other processes in your system.

Step-by-Step
Step 1: Expressing Interest
The baptism process begins when an individual completes the Baptism Registration Form, providing basic contact information. Once submitted, a workflow automatically triggers a Baptism Connection Request, notifying the Engagement Team’s designated connector.
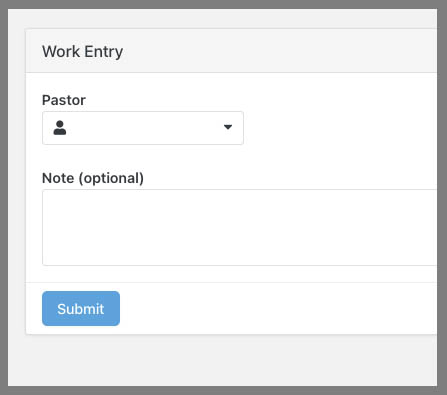
The Engagement Team Connector then assigns the request to a pastor by launching a workflow directly from the connection request. This workflow includes a Person Picker, allowing for flexible pastor selection, and a Message Box, where the connector can add any relevant notes to the assigned pastor.

Once completed, the chosen pastor receives an email notification containing the applicant’s details and a direct link to their connection card. At this stage, the connection status updates to “Pastor Assigned.”
Step 2: Interview & Scheduling
At this stage, the assigned pastor takes the lead. After receiving the notification email, the pastor initiates a workflow from the connection to schedule an interview with the applicant. This workflow, launched directly from the connection, pre-fills an email invitation, allowing the pastor to specify availability or include a Calendly link—an online scheduling tool where applicants can select a convenient time from the pastor’s calendar. Once an appointment is set, Calendly automatically adds it to the pastor’s calendar and sends confirmations to both the applicant and the pastor.
After the interview invitation is sent, the connection status updates to “Waiting to Schedule.” If scheduling takes longer than expected, a backup workflow triggers a reminder email every seven days until the connection status changes.
Once the applicant schedules the interview, the pastor updates the connection status to “Interview Scheduled.” After the interview, the pastor completes a form within the connection, either recommending the applicant for baptism (with relevant notes) or closing the connection if the applicant decides they’re not ready. This submission automatically notifies the original Engagement Team connector.
At this point, the connection shifts back to the Engagement Team, who initiate a workflow to send an email containing a link to a form where the applicant can select their preferred baptism date and indicate their t-shirt size. Once the date is chosen, the connection status updates to “Baptism Scheduled,” and the applicant is added to a group designated for that specific baptism date.
Baptism Connection Board View with Statuses

Step 3: Post-Baptism
Following baptism, the Engagement Team can perform a bulk update to add the baptism date to each participant’s profile, using either from a report list or the baptism date group list. These lists also streamline the process of printing baptism certificates using a merge template, making it easy to generate personalized certificates for each individual.
This baptism process is designed to be both comprehensive and efficient, ensuring a smooth experience from start to finish. To help you get started, download the PDF below to begin drafting your own version. I've included a second Baptism Process download with a simplified version.
When you’re ready to build a baptism process—or any other process—in Rock, feel free to reach out. We’d be happy to assist in creating a process tailored to your needs.
Where to Start?
After reading this article, you might be feeling one of two ways: overwhelmed by the idea of starting a new process from scratch or motivated to improve an existing one. Either way, the key is to take small, manageable steps toward better tracking and organization.
If your current process feels outdated or incomplete, you don’t need to overhaul everything at once. Instead, start with the tools and features that will have the most immediate impact. Even incremental changes can set you on the path to creating a process that meets your ministry's needs.
Practical Steps to Begin:
1. Download the Process PDF - Use this as a guide to map out a process that works for you. It’s a starting point you can customize to fit your specific needs. At the end of this article, you’ll find two download links:
- The Baptism Flowchart PDF – This is the detailed process covered in this article.
- The Simple Baptism PDF – A streamlined version of the baptism process for a simpler approach.
2. Implement individual Steps
- Build your Baptism Application in a Rock Registration.
- Add a Baptism Merge Template for streamlined certificate printing.
- Manage the baptism process through a Connection Board.
- Add a Baptism Date Person Attribute to simplify reporting.
Remember, every step forward—no matter how small—moves you closer to a process that is streamlined, efficient, and scalable. Whether you’re refining what’s already in place or building something new, these tools can help you take the next step with confidence.
Looking for support with your processes? Click "Contact Us" below to start the conversation.
Looking Ahead
Don't miss next month's blog, Building a Reliable Testing Process in Your Database
Testing workflows, forms, and applications within your database is essential—but without a structured process, it can quickly lead to clutter and data issues. Our guide walks you through a step-by-step approach, from setting up a dedicated Test Family to implementing effective cleanup practices. We'll also cover the practicality of a development site, providing a safe space for testing without affecting real data. Plus, we’ll discuss testing upgrades in development and establishing a safe process for upgrading your live environment to the next version of Rock. Maintain a clean, organized testing environment that protects your database and keeps workflows running smoothly.
Baptism Process Flowchart PDF
Simple Baptism PDF