Streamlining Volunteer Onboarding for Vulnerable Populations
In my younger days, planning for a camping trip often meant stuffing whatever we could fit into our two-door Honda Civic and hoping we hadn’t forgotten anything important. After one too many trips trying to cook meals without a can opener, attempting to set up a tent without stakes, or navigating to the campground restroom at midnight without a flashlight, I quickly realized the need for a more organized approach.
Once kids entered the picture, that planning became even more crucial—and more detailed. I created printable checklists for each person and all of our supplies, ensuring nothing was left behind. I even had tubs pre-packed with camping essentials, so we didn’t have to start from scratch every time we went on a trip.
The same principles of preparation apply to other areas where we want everything to go smoothly. Whether you’re planning a family camping trip or managing the onboarding of volunteers, detailed planning makes all the difference. Especially when onboarding volunteers for vulnerable populations, a meticulous process ensures everyone’s needs are met.
The process I’ll outline here is one developed by a client who has successfully used it over several years for onboarding volunteers in Kids Ministry and Special Needs Ministries. Included is a process diagram and an overview of the Rock database tools supporting each step. While this is a robust model, remember that your specific needs or legal requirements may vary.
Volunteer Onboarding Tiers
When someone expresses interest in volunteering, they are categorized into a tier that determines the steps they must complete before serving. Here are three potential tiers of onboarding requirements:
-
Tier 1: Volunteer Application Only
For roles with minimal interaction or risk, volunteers can serve after completing just an application.
-
Tier 2: Volunteer Application and Background Check
This tier covers roles such as hospitality teams, greeters, and office admin teams, where an additional level of screening is necessary.
-
Tier 3: Volunteer Application, Background Check, and Membership
Required for positions such as teachers, mentors, table leaders, worship leaders, and team leaders, these roles involve significant interaction and responsibility.
This blog will focus on Tier 3 volunteers, who must complete an application, undergo a background check, and maintain active membership. This tier represents the most involved onboarding process and is especially critical for roles serving vulnerable populations, such as children or individuals with special needs. For volunteers under 18—where background checks are not an option—additional steps are implemented to ensure the process remains thorough and safe.
Leveraged Rock Tools
Leveraging Rock’s suite of tools streamlines the onboarding process, making it familiar and easily adaptable to other processes. Relying on these core tools instead of custom-built alternatives simplifies maintenance and scalability across multiple processes.
The following Rock tools ensure a secure and efficient onboarding experience for volunteers:
- Connection Requests – Captures initial interest and facilitates engagement.
- Workflows – Automates each step of the onboarding journey, ensuring consistency and progress.
- Registrations – Manages volunteer applications seamlessly.
- Check-In – Tracks attendance for orientation sessions or training events.
- Reports – Monitors onboarding milestones and ensures compliance.
- Group Scheduling – Assigns volunteers to roles and events efficiently.
- Suggested Plugin: Survey System - Gathers feedback and additional information; requires installation for use.
Together, these tools create a seamless, well-organized onboarding experience that supports both volunteers and administrators.
Overview of the Process
Here is a summary of the planning steps I'll be reviewing. Each step is anchored to its section, so you can click on a step to jump directly to that part of the article:
- Initial Engagement
- Application & Requirements
- Group Scheduling & Serving
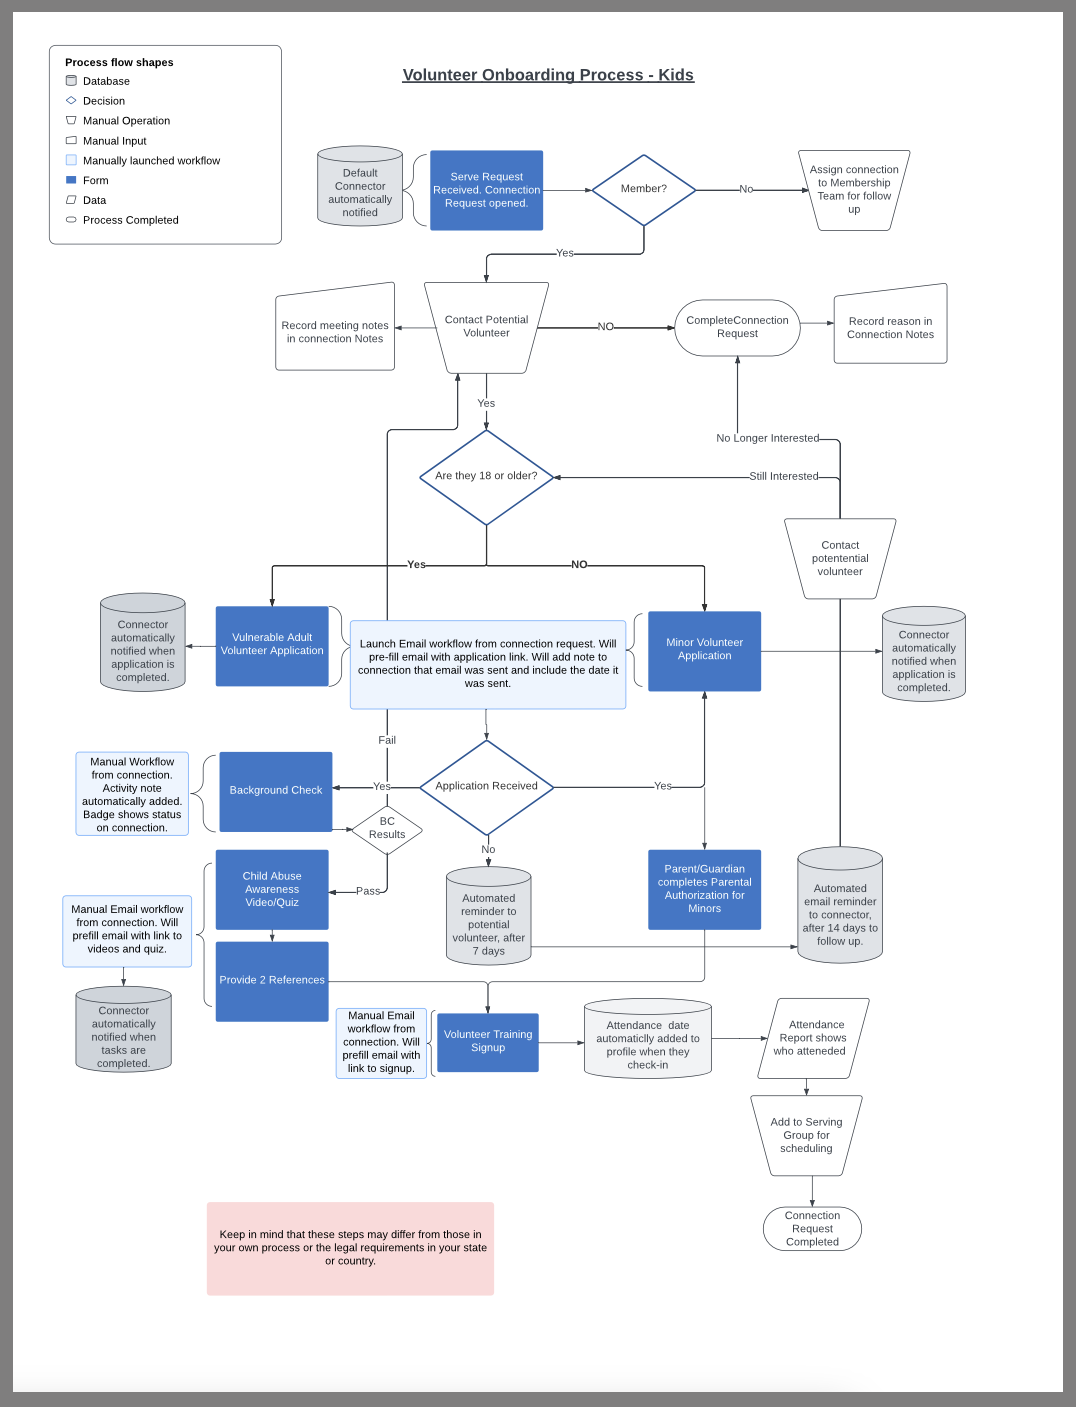
Flowchart Visual
To ensure a safe and thorough onboarding experience, the flowchart below outlines each step in the journey. This visual guide breaks down the entire onboarding process, ensuring that every requirement is met for a secure and comprehensive screening process.
The steps illustrated here are specifically designed for onboarding volunteers who will serve vulnerable populations, such as children or individuals with special needs. Each stage emphasizes thorough preparation and consistent follow-through to guarantee a safe and welcoming environment.
A downloadable version is also available at the end of this article for your convenience.
Step-by-Step
Step 1: Initial Engagement
The onboarding journey begins when a potential volunteer expresses interest through the Serve page on your website. This initial step is designed to be seamless, inviting, and efficient to encourage participation.
- Dynamic Serve Options: Opportunities are displayed in card format, allowing volunteers to search based on criteria you define—such as campus location, ministry area, or specific interests.
- Simple Entry Form: Each opportunity includes a straightforward form for volunteers to provide basic contact details, creating a user-friendly entry point.
- Automatic Notifications: Once a form is submitted, a Connection Opportunity is automatically generated in Rock, and the designated connector for the role is notified.
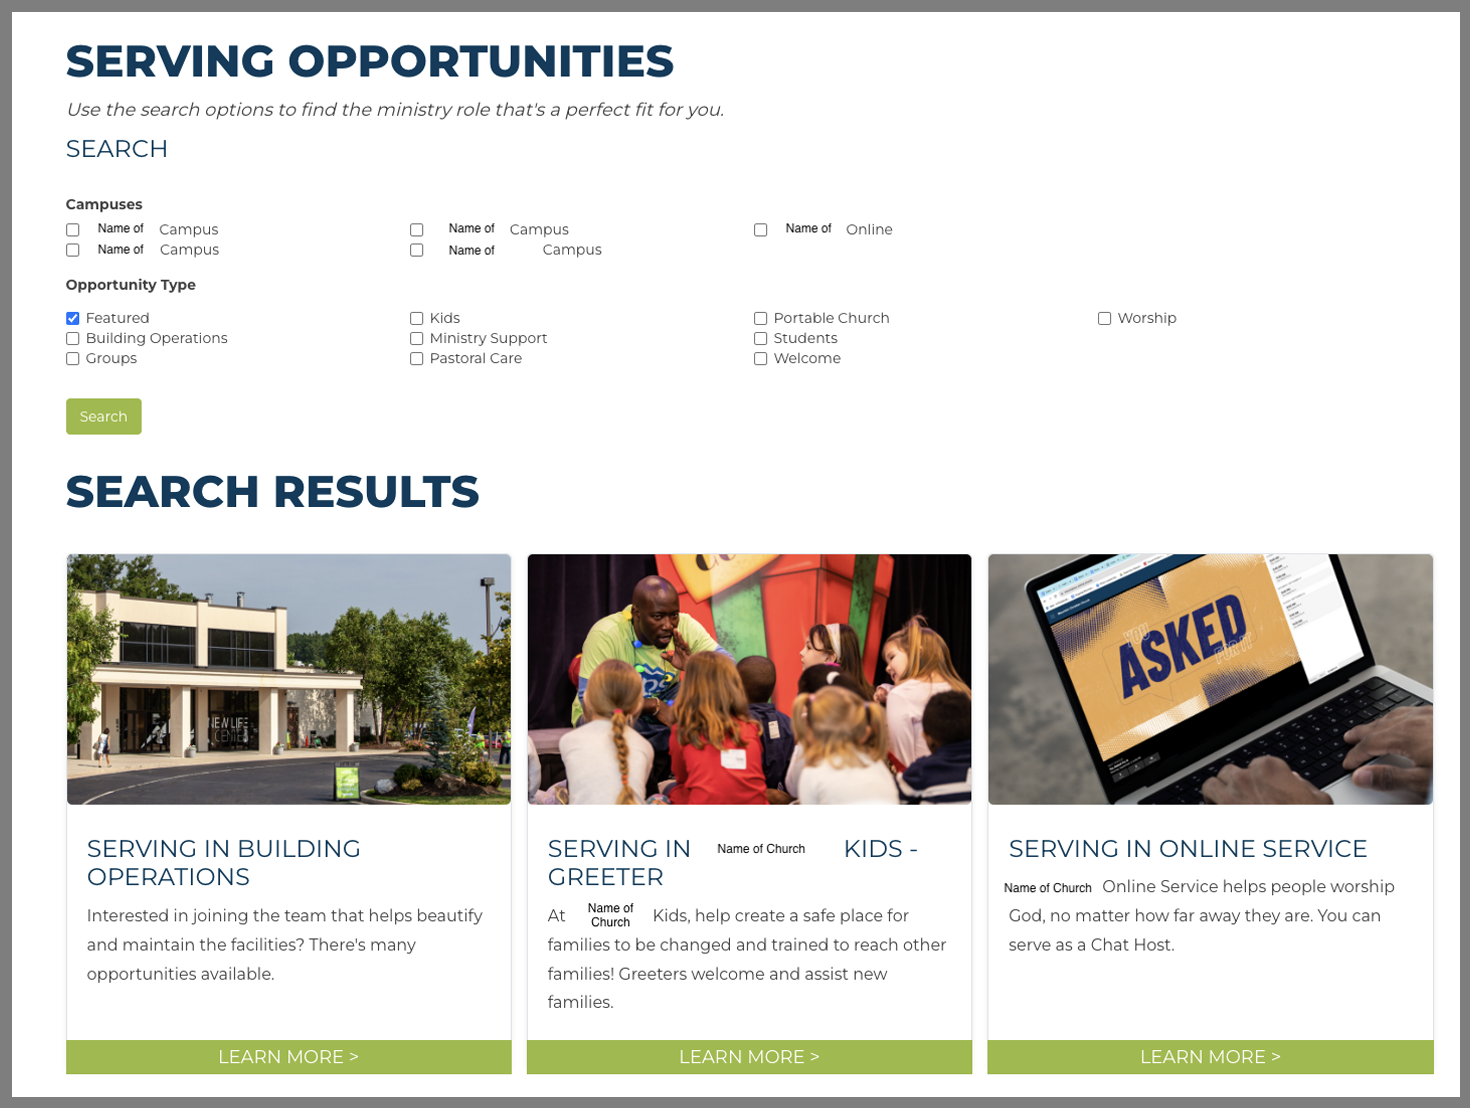
Example of Online Connection Opportunities
To manage the onboarding process efficiently from this point forward, Rock’s Connection Request tools come into play. Configured statuses and activities make it simple to track each step and ensure clear progress for every volunteer.
One of the initial steps is determining whether the volunteer is a member. To streamline this process, you can display membership status directly on the Connection Detail page, allowing for quick eligibility checks.
Example: A Connection Detail showing "Member" status enables the connector to quickly confirm eligibility and advance the volunteer to the next step in the onboarding process.

Connection Request card showing Member status and Badges
By automating and organizing these early stages, you create a seamless experience for both volunteers and staff. This reduces manual effort and ensures everyone stays on track throughout the process.
If a volunteer is not yet a member, the connector can promptly assign the Connection Request to the appropriate person for membership follow-up. This step guarantees the volunteer receives the guidance needed to complete the necessary requirements, keeping the onboarding process efficient, consistent, and progressing smoothly.
With the initial engagement complete, the next section will outline the Application & Requirements phase, where volunteers move closer to serving in their roles
Step 2: Application & Requirements
After confirming the volunteer's membership status and establishing initial contact—whether by phone or in person—the application process begins. This step varies based on the applicant’s age, with distinct applications and steps for adults (18 and older) and minors.
A manual workflow, triggered from the connection, sends a pre-filled email with a link to either the Vulnerable Adult Volunteer Application (registration) or the Minor Volunteer Application (registration). Both applications are created as Rock registrations linked to workflows, which automatically log a connection activity and record the date the application was sent.
- Automated Follow-Ups: If the applicant does not complete the application within 7 days, an automated reminder is sent; After 14 days with no response, an automated email notifies the connector, prompting them to reach out to the potential volunteer to confirm their interest.
- Tracking Application Completion: Once the application is completed, a badge appears on the connection request, indicating the step is finished.
- Background Checks: After receiving the application, the connector manually launches a workflow from the connection to send a background check request to the volunteer.
- Training and References: If the background check results are cleared, the connector initiates another manual workflow from the connection. This workflow sends a pre-filled email containing:
- Links to required training videos and quizzes (Survey System plugin).
- A link for the volunteer to send to their required references (Survey System plugin).
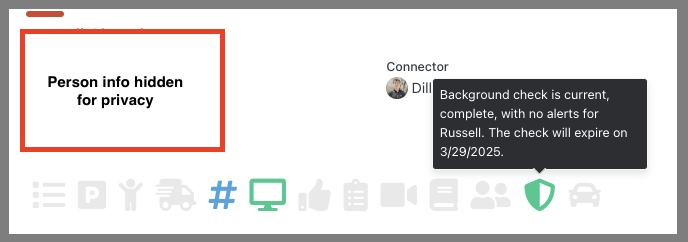
Connection Request card showing Background Check Status Badge
Suggested Plugin for Enhanced Process Management: Survey System
The Survey System plugin is available in the Rock Shop under the General category. You can build forms with questions to be filled or quizzes to be graded. One of the advantages of using the Survey System is that it does not create records in Rock. So for example, references who may not be in Rock or even attend your church, can fill out a reference and a Rock record will not be created for them. The information will remain in the form results. For quizzes, the user will see their grade and detailed results.
- Quiz Administration and Grading: The Survey System plugin administers quizzes based on the awareness training videos, automatically grades the results, and notifies the connector once a quiz is completed.
-
Reference Management: The Survey System plugin is customized to collect and manage reference information efficiently. Unlike registrations, this setup ensures that references are associated with the applicant’s requirements without creating individual records in Rock for the users who serve as references. This approach keeps the process streamlined and focused on the applicant’s onboarding steps.
Step 3: Group Scheduling & Serving
With everything in place, your volunteer is now prepared to move on to the final steps of the onboarding process, where they’ll be scheduled for group training and equipped to begin serving.
From the connection request, you’ll manually launch a workflow that includes a pre-filled invitation to volunteer training. This email contains a link for the volunteer to choose from available training dates, which are managed through registrations.
When the volunteer attends training, they will check in, and their attendance will be automatically recorded. A workflow will then update the attendance date on a designated person attribute. Once this attribute shows a date, the badge on the connection card will indicate that the volunteer has attended, and their status will change to "Ready." At this stage, your volunteer is fully prepared for scheduling.
Finally, you’ll use a workflow to assign the volunteer to the scheduling team, completing their connection request.
As you can see, onboarding volunteers involves many steps, but with a well-structured and thoughtfully implemented plan, a multi-step process becomes manageable. This approach not only reduces the workload for your staff but also strengthens confidence in the safety of your vulnerable population ministries.
Where to Start?
You’ve read through this article and might be feeling one of two ways: overwhelmed by the idea of starting a new process from scratch or motivated to improve an existing one. Either way, the key is to take small, manageable steps toward better tracking and organization.
If your current process feels outdated or incomplete, you don’t need to overhaul everything at once. Instead, start with the tools and features that will have the most immediate impact. Even incremental changes can set you on the path to creating a process that meets your ministry's needs.
Here are a few practical steps to begin:
1. Download the Process PDF - Use this as a guide to map out a process that works for you. It’s a starting point you can customize to suit your specific needs. The download link is at the end of this article.
2. Implement individual Steps - Rather than tackling the entire process at once, focus on key areas that will help you track better. Here are some ideas to get started:
•Build your volunteer applications in Rock registrations.
•Create online Serve Opportunities that will open a Connection Request in Rock.
•Set up Group Scheduling to organize and assign volunteers effectively.
•Use the Survey System plugin to collect references for your volunteers.
Remember, every step forward—no matter how small—brings you closer to a process that is streamlined, efficient, and scalable. Whether you’re refining what’s already in place or building something new, these tools can help you take the next step with confidence.
Looking for support with your processes? Click "Contact Us" below to start the conversation.
Looking Ahead
Don't miss next month's blog, Building an Efficient Baptism Process
Transform the way you manage baptisms with our comprehensive guide to creating an automated, efficient process in Rock RMS. We’ll walk you through a step-by-step approach that streamlines everything from initial interest to post-baptism follow-up. By leveraging Rock’s powerful tools—like Workflows, Connections, and Reports—this process simplifies scheduling, communication, and tracking, making the experience memorable for participants and manageable for your team.
To download the Volunteer Process Workflow PDF, Click Here.